
The lecture is targeted to teach medical students anatomy of the lens, causes of cataract, how to treat cataract ( steps of Phacoemulsification) and what are the complications of cataract surgery. The lecture is written with the aid of the ophthalmology team at Mutah university, Dr. Khalid al Zubi, Dr. Fawaz al Sarayreh and Dr. Khalil Al-Salem.
Dr. Khaled al Zubi lecture
INTRODUCTION
Cataract surgery (Phacoemulsification) is the most commonly performed procedure Jordan. Up to 90% of individuals will have a cataract by the age of 65. Moreover, half of those individuals will have a visual disability because of their cataracts. This is not surprising, as the likelihood of having a cataract climbs with each year lived.
Anatomy of the Lens
The lens is a biconcave disk found just behind the iris and in front of the vitreous body. It is circumferentially suspended to the ciliary body by cords called zonules. The ciliary body is a circular muscle inside the eye. It tenses or relaxes the zonules to change the shape and thickness of the lens. This controlled transformation of the lens alters the angle of the light entering the front of the eye, which allows us to focus images nearby or in the distance onto our retinas—an action referred to as accommodation. The lens has three major parts, all transparent and all circumferentially layered. A popular way to conceptualize the lens involves imagining it as a clear peanut M&M. We will start from the inside out.

What are the detailed anatomy parts of the lens?
| THE NUCLEUS (THE PEANUT) | In the center of the lens is the nucleus. The nucleus represents the majority of the lens that is present when we are born. As we age, additional layers are added to the outside of the nucleus, creating the lens’s cortex. The nucleus will always remain the most central and oldest part of the lens anatomy. |
|---|---|
| THE CORTEX (THE CHOCOLATE) | As we age, layers of transparent fibers are created and layered around the nucleus to create the cortex. Similar to the rings on a tree, the youngest layer is always the most peripheral. These layers are not refreshed or renewed. Instead, they are preserved, which means that the mass of the lens increases over our lifetime, from approximately 1.5 million fibers at birth to 3.5 million fibers at 80 years of age. This accumulation increases both the thickness and width of the lens while compressing and hardening the nucleus. |
| THE CAPSULE (THE CANDY SHELL) | The nucleus and cortex are surrounded by a transparent elastic membrane called the capsule. This is the basement membrane of the lens epithelium (which becomes those fibers mentioned above) and is referred to as “the bag” by the ophthalmologist. The previously mentioned zonules are connected to the capsule’s equator. Changing the shape of the bag changes the shape of the lens, thus allowing accommodation to occur. During phacoemulsification cataract surgery, a procedure described later in this tutorial, the anterior part of the capsular bag is opened so that the nucleus and cortex of the lens can be removed. The remainder of the capsule is maintained to serve as a “bag”, which holds the newly inserted intraocular lens (IOL). |
What are the SYMPTOMS of Cataract?
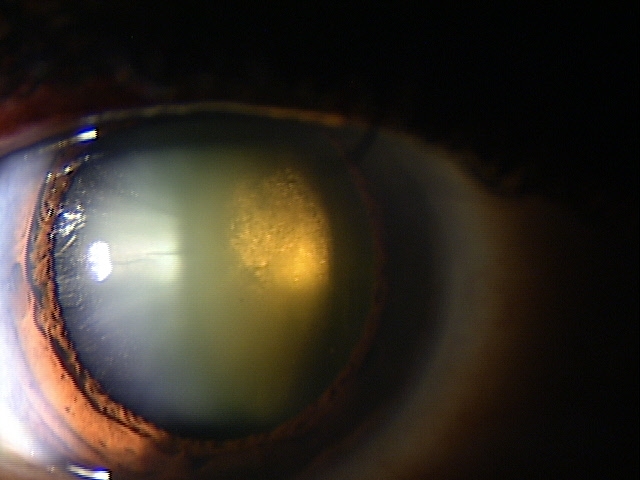
A cataract is any opacity or discoloration of the usually clear crystalline lens. This opacity or discoloration prevents light from passing properly through the lens to focus on the retina. Symptoms appear slowly and painlessly. They include any one or all of the following:
cloudy/blurry vision
glare
halos
perception of faded colors
yellowing/browning of vision
decreased night vision
frequent eyeglass prescription changes
What are the TYPES OF CATARACTS
The different types of cataracts are generally described by their position within the lens, as noted below.

Nuclear cataract
The innermost, oldest layer of the lens. Nuclear cataracts are the most common cataracts. The patient may notice progressive loss of vision and decreased perception of certain colors, particularly blues. Although mostly age-related, studies have linked these types of cataracts to smoking, diet, and gender

Cortical cataract
Cortical the outermost, youngest layer of the lens. Cortical cataracts are four-fold more common in African Americans and linked to diabetes mellitus, trauma, smoking, and excessive sunlight exposure. Patients can have vision loss, halos and glare that are especially noticeable while driving at night. This cataract has a wedge shaped or “cortical spoke” appearance that commonly appears inferiorly and nasally

Posterior Subcapsular:
Just under the candy shell. Posterior subcapsular cataracts are associated with diabetes mellitus, radiation, smoking and long term corticosteroid use (Solomon and Donnenfeld 2003). The symptoms associated with this cataract (glare, halos, image blur, and distortion) are usually more rapidly progressive compared to other types of cataracts and are therefore usually more noticeable to the patient.
Examination steps before cataract surgery?
Ophthalmoscope: Think of looking through a dirty window when using a direct ophthalmoscope to examine a patient with a cataract. If a patient has told you his or her vision was blurred or yellowed when looking out, and those symptoms are caused by a cataract, you will probably have the same experience looking in. A cataract will dull the red reflex but should not cause a relative afferent pupillary defect. Dulling of the red reflex in this situation is caused by light scatter, not blockage of light. So the same amount of light is getting to the retina, but it is not focused on the fovea, so this eye should not have a relative afferent pupillary defect if the cataract is the only reason for the visual decline.
Slit Lamp: If you adjust the angle of lighting for optimal viewing, the slit lamp will always give the best view of any abnormality in the lens.
Rapid Q and A : Can a mature cataract cause a RAPD?
The answer is NO. The presence of an RAPD with a Cataract means a poor outcome after surgery. It means that your patient has a total retinal detachment or optic neuropathy caused by Glaucoma or an ischemic event like arteritic or non-arteritic ischemic optic neuropathy.
Cataract Surgery INDICATIONS
As mentioned in the examination section, cataracts cause visualization challenges for both the patient and the ophthalmologist. For this reason, cataract surgery may be indicated in 2 general situations: trouble seeing out or trouble seeing in.
| TROUBLE SEEING OUT | TROUBLE SEEING IN |
|---|---|
| A patient may be referred for cataract surgery when the cataract decreases visual function such that it interferes with daily living activities or prevents the patient from meeting visual acuity standards for driving, work or other such activities. A systematic review of the cataract literature from Canada showed delaying surgery for more than 6 months increased falls, decreased quality of life and decreased visual acuity (Hodge 2007). Generally, Phacoemulsification should not be performed if glasses or contact lenses can satisfy a patient’s needs. | Many ophthalmological disorders including diabetic retinopathy, glaucoma, and macular degeneration require the ophthalmologist to accurately visualize the retina or other structures of the eye posterior to the lens on a regular basis. A cataract may obscure the ophthalmologist’s view and may hinder the appropriate monitoring of these degenerative problems. It is appropriate to have a cataract removed (Phacoemulsification) so these conditions can be properly monitored. |
PREOPERATIVE TESTING
Testing performed prior to Phacoemulsification includes:
Visual acuity measurement in both dim and bright lighting
Examination of pupils for a relative afferent pupillary defect
External eye exam to determine any complicating external factors
Retinal examination
Measurement of corneal curvature and axial eye length to calculate IOL power
Gonioscopy, especially if the plan is to place a lens in the anterior chamber or there are concerns about uveitis or peripheral anterior synechiae
BONUS:
Routine preoperative testing including EKG, complete blood count, electrolytes, creatinine, urea nitrogen, and glucose was not found to be beneficial prior to cataract surgery (Phacoemulsification) as intraoperative or postoperative complication rates were similar for those who did and did not have routine preoperative testing prior to cataract removal (Keay 2009).
COMPLICATING FACTORS in Phacoemulsification
Complications of cataract surgery might happen in a minority of cases. As the success rate of having a Cataract surgery free of complications is 99%. The most important factors which might cause complications of cataract surgery
Small pupils hindering view and access to the lens
Large brow ridge interfering with surgeon’s ability to maneuver instruments
Inability to lie flat or remain still during the procedure
Zonular laxity increasing the likelihood of lens or IOL dislocation
Small anterior chamber decreasing workspace between the lens and cornea
Patient on anticoagulants when a clear corneal incision cannot be done
Patient on alpha-1 blockers for benign prostatic hyperplasia causing “floppy iris” syndrome
Phacoemulsification steps for medical students
If you are going to rotate through ophthalmology, you will likely see a cataract surgery. While the ability to spot a cataract will get your observation checklist marked, being able to speak knowledgeably will be noticed. Below is a list of the steps involved.
1. Creation of a paracentesis
Using a blade while stabilizing the eye with a fixation ring
2. Instillation of topical lidocaine
into the anterior chamber of the eye
3. Placement of an ophthalmic viscoelastic device (OVD) in the anterior chamber.
This “gel” is thicker than the aqueous of the anterior chamber it is replacing. It serves two purposes. One is to maintain the shape of the anterior portion of the eye allowing the surgeon room to maneuver. The other is to protect the inside of the cornea from the ultrasound energy emitted by phacoemulsification. The gel coats the tender inner surface of corneal endothelial cells protecting them from ultrasound energy.
4. Creation of the main wound.
This wound is usually started in the clear portion of the cornea, but it can also be started more posterior (from the limbus) or even more posterior (from the sclera). Each area has its advantages or disadvantages based on ease, possible deformation of the cornea, ability to convert to a different surgical technique if needed and rate of post-surgical infection.
5. Capsulorhexis.
A hole is created in the capsule so that the surgeon can access and remove the nucleus and cortex of the lens. If you recall the previous M&M analogy, this could be described as “peeling off the front of the candy shell to remove the chocolate and nut inside”.
The purpose of this step is to create access for removal of the lens fibers while still maintaining the integrity of the rest of the capsule, so it can hold the prosthetic lens. Here you will see the ophthalmologist perform a continuous curvilinear capsulorhexis (CCC) by creating a tag of capsule and then carefully maneuvering it to peel away a circular opening to the lens fibers. This is a technically challenging aspect of cataract surgery that takes years to master. Another technique is called “The Can Opener” technique. As you can imagine, it is not nearly as elegant, but can still be necessary in some cases.
6. Hydrodissection.
The cortex of the lens is attached to the capsule. The capsule needs to remain so it can be used to hold the IOL. To separate the two, a balanced salt solution is injected between these two layers to cleave them away from one another. After this procedure, the lens should be freely mobile within the lens capsule. You will see the surgeon rotate the lens like a record on a turntable toward the end of this technique to ensure that the lens is mobile.
7. Phacoemulsification.
This tool uses ultrasound energy to break down or emulsify the nucleus of the lens. A vacuum is attached to the ultrasound probe in order to suck away freed pieces as they are disassembled. Techniques with names such as the “Stop n’ Chop” and “Divide and Conquer” are used to safely fragment the nucleus into manageable pieces for emulsification and removal.
8. Cortical Aspiration.
Aspiration is used to grab the cortex and peel it away from the inside of the capsule. This is the most likely time to cause a tear in the capsule, which can allow the vitreous entry into the anterior chamber (a bad thing). Referring back to our analogy, the chocolate is removed in this step leaving an empty shell (the capsule) to be filled later with the intraocular lens (IOL).
9. Filling the bag with OVD.
Just as before in the anterior chamber, the OVD is used to maintain the structure of an evacuated space allowing for increased maneuverability and safety.
10. Placement of intraocular lens (IOL),
Which has 2 parts: 1) an optic and 2) two arms or haptics branching from the side to hold the entire structure in place within the capsular bag. To fit the optic and the haptics into the small incision, the IOL is folded and injected through a cylindrical tube into the eye. In the video example, a single piece acrylic IOL is used and the haptics are placed centrally on top of the optic. Then the optic is rolled around the haptics in a soft shell taco formation (I know, enough with the food analogies).
This “taco lens” is then pushed through a cartridge into the capsular bag where the haptics unfold and the optic is adjusted so that the haptics are at a 90-degree angle to the wound. If the optic is right side up, the haptics will look like a backward “S”. If the optic is upside down, the haptics will take on the appearance of the letter “S”, which alerts the surgeon to “STOP!” and reposition the lens.
11. Removal of OVD
OVD should be removed from the capsular bag and anterior chamber. Failure to remove OVD might cause a transient increase in intra-ocular pressure
12. Hydration of the corneal incision to “close” the wound.
Water causes the cells of the cornea to expand and press against one another, sealing the wound shut without sutures.
13. Application of antibiotic drops
Additional readings
http://cataractcourse.com/lens-anatomy-and-development/lens-anatomy/
Retinoblastoma for medical students
Uveitis for medical students (Mutah University)